

Looking for a light-hearted way to trick your friends and have fun with photography at the same time? Learn how to make it look like you’re anywhere in the world in this quick, easy tutorial! We’ll be using Photoshop Elements, but the process is pretty much the same no matter what program you use.
Step 1: Choosing your foreground
With enough time and effort, you could cut any person out of almost any picture and insert them convincingly into almost any other picture. Today, we are focusing on making it easy, and that means we’re making a fake selfie.
Your original “portrait” doesn’t have to be a selfie, but if you select a photo of yourself that will allow you to put the scenery behind you, rather than requiring you to insert yourself into the scenery, the process becomes infinitely simpler. Watch for shadow patterns or unusual lighting, or your final result will look wrong. (This is one of the few cases you don’t want a perfectly-lit portrait.) Finally, minimal fine details around the edge will make the selection/integration process much easier.

I’m using this photo because:
- it includes a minimum of hair detail,
- I can visualize a variety of backgrounds working with it,
- the lighting is fairly even and therefore adaptable,
- and I’m making a weird face, which adds to the fun.
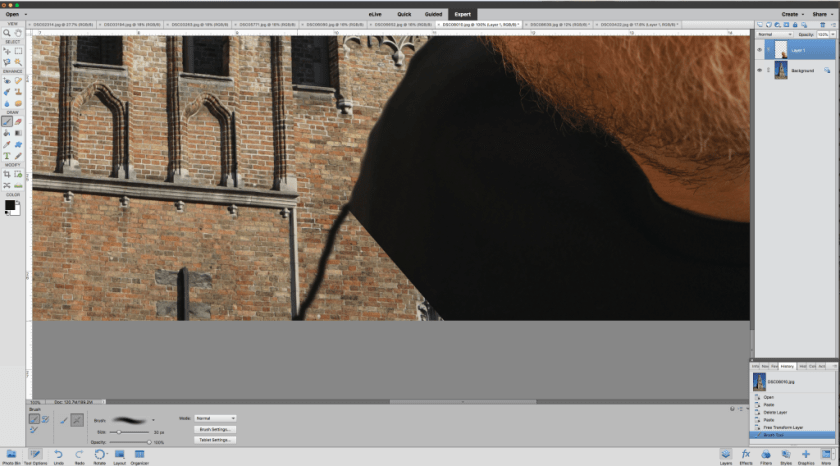
Step 2: Isolating your subject
Now we need to extract ourselves from the original background. We’ll create a .png file with a transparent background that you can layer over any exotic locale you wish, known in the parlance of the meme-makers as an “exploitable.”
If you have a very plain and high-contrast background, you can use the magic wand to select the whole thing. However, that is a very uncommon situation. For this photo and for most photos, the magnetic lasso tool is your best friend for laying the groundwork of your selection.

Click somewhere along the edge of the area you want to select (that is, you) and drag your mouse pointer along the approximate contour of your body. The selection line will automatically snap to areas of high contrast. You can adjust the sensitivity of the lasso in the tool options at the bottom of the window.
Once you’ve gotten the rough selection done, refine the results by adding to or subtracting from the selection. To add to your selection, pick your tool (regular lasso, magnetic lasso, polygonal lasso, rectangular or elliptical marquee, magic wand, etc.), hold down shift, and select as normal. To remove areas from the current selection, hold down option instead. (If you are using Photoshop CC or any CS version, the quick mask is an even more accurate method to refine your selection.)

Optional step: once I’ve refined the selection to match the contour of the target, I like to feather the selection just a tiny bit to make it a little easier to blend—this makes the extends the edge of the selection slightly with diminishing opacity, giving you a fade-out rather than a hard cut. To do so, go to the “Select” drop-down menu and choose “Feather…” The number of pixels to feather will depend on your image’s resolution, but just a few pixels should do it for most images.
Now you’re ready to extract yourself! Hit ⌘-X ⌘-V on Mac or Ctrl-X Ctrl-V on PC and watch your carefully-selected section become its own free-standing layer. Delete the background layer and check the edges for anything that may be disruptive to believability—search and destroy! I like to run the very edge of a soft eraser along the hairline to make it look a little more real.

For safety, save your image as a .png or .tif (image formats that support transparency—if you saved as a .jpg and had to reopen it before trying to paste it elsewhere, the background would be all white and you’d have to reselect the image portion).
Step 3: Total travel freedom!
Now comes the fun part! The most important part of choosing your background is the lighting—be sure to look for photos that are lit more or less at the same level of brightness and from the same direction as the image you’re pasting in, or people will instinctively notice it’s not real.


Protip: If you need to match a color quickly, select the brush tool and hold down option (Mac) or alt (PC). Your pointer will change into an eyedropper, and whatever color you click will become your foreground color, ready for immediate brush-use.


And, voilà! I’m in Bruges. Where else will I go?
Other tools to help you blend in
Other than hue/saturation, you may need to adjust the density of your image. You can do that for the whole image or color by color using Levels (“Enhance” > “Adjust Lighting” > “Adjust Levels” or ⌘-L/Ctrl-L). And don’t forget: if you fight and fight with the color but just can’t get it right, go black & white!

For the classic darkroom experience, Photoshop also includes dodge and burn tools. With an artful hand, you can match striped or otherwise mismatched lighting. Just use a very light touch! The default opacity is usually 50%, which is uncontrollably strong. In order to use these tools with any accuracy, I would recommend reducing the opacity to 10–15%, choosing a very soft brush, and making multiple passes.

There you have it! Feel free to ask questions in the comments, but otherwise go forth and fool.

Share your successes on our Facebook page or on Instagram #mymikescamera so we can all enjoy.


Heh heh heh, nice!
Amazing!