

Although the low-light performance of cameras keeps getting better every year, night photography remains a completely different experience from daytime photography. Shooting during the day, it’s easy to get spoiled. Light is a constant consideration, but as a general rule you’re more likely to have too much light than too little. Controlling a subject is more important than worrying about having enough light.
Part 2: Adding Your Own Light
Part 3: Fire & Specialized Lighting
Class: Sign up for our in-depth workshop, May 23rd at Park Meadows!
At night, however, scarcity determines obsessive priority. Just as the crowd at a gastro-pub type place shifts after the sun goes down, nocturnal photographers use a rather different rulebook. There are no hard rules in art, but here are a few generalities I’ve observed that might help you. Today’s post will focus on available-light night photography.
The best results will not be obvious beforehand
As a self-professed sharpness junkie, I recognize the value of a crisp, perfectly focused photo, but I know that I need to leave that impulse at the door when doing night photography. At the end of the day (haha), it’s simply impossible to expect the same level of performance with so much less light. This means that the importance of technical success is replaced by creative use of lighting. The more limited range of lit subject matter (as well as the narrower depth of field that results from using a wider aperture) lends itself to abstract photography as well, as subjects are necessarily removed from their context.

I got this by putting my camera on a tripod, setting a 1.6″ exposure, and zooming in while the shutter was open. Something like this would be impossible with the sun obscuring the lesser lighting, but shooting at night is all about looking for the light that does exist and getting creative with it. In a happy reversal from the usual struggle to capture a real-life beauty, long exposures sometimes give you more interesting results than reality, too.

Case in point: when we visited Iceland, one of the most surprising things to me was how faint the northern lights were. We were on the outskirts of Aurora season, admittedly, but all we could see with the naked eye was a foggy wash of white in the sky (still really cool, don’t get me wrong). 30 seconds of open shutter, however, revealed incredible colors hidden from our view.
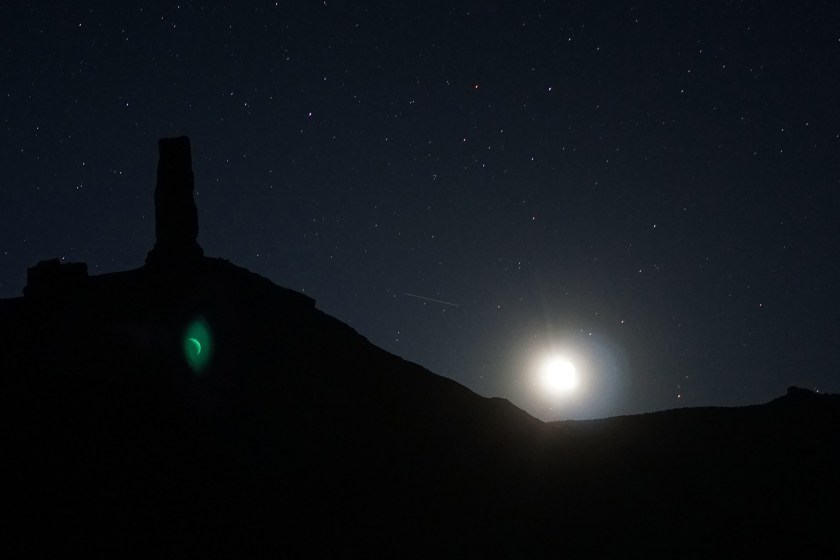
A side note on astral photography: to avoid star trails, the “500 rule” is a good general guideline. Divide 500 by the focal length at which you are shooting, and that will be the approximate number of seconds you will be able to shoot without getting blurred stars. The picture below was shot at 30″, but with the 35mm lens I was using, I shouldn’t have exceeded ~15″… hence, the blur. The photo above was shot with a 16mm lens, which put my 30″ exposure in the clear.

Here’s one more unexpectedly cool result. The moon seems to have caught just the right angle with my UV filter, creating a bizarre but exciting phantom double.
The pace is much slower
As you would imagine, a photo shoot made up of 30″ exposures tends to go a little more slowly than those where the slowest would be more like 1/30″ (and there’s no pressure created by disappearing light). Night photography asks you to enjoy the process as well as the product!

This photo was shot at ISO 100 and is reasonably sharp given the darkness of the scene. I think the contrast created between the subject and the background makes for a much better photo than it would have been in the daytime. That being said, in order to reconcile those two facts, I had to have time and space to set up a tripod as well as time to let a few exposures slowly sop up the little light there was (a street lamp). I had to choose different subject matter and work at a nice relaxed rhythm.

This one required a few dozen exposures at 20-30 seconds each, which were then layered on top of one another in Photoshop (a technique known as stacking). A lot of time and energy—which felt a lot longer while being swarmed by mosquitos—but the photographer came out at the other end with a seemingly miraculous photo of the lightning bugs swarming around what was an almost pitch-black forest. Patience is rewarded at night.
Long exposures are practically magic
You don’t need dramatic, exotic locations or subjects to enjoy long exposures, of course. If you’ve never tried it, I urge you to find somewhere dark, set up a tripod, and see what you can reveal with a 30″ exposure. The first time you make it through the wait and see a bizarre, alien landscape pulled out of the blackness, I guarantee you’ll want to do more.

In addition to capturing dark subjects, long exposures can help you capture elusive bursts of light in the darkness. The lightning bugs, above, are a good example of this, as are photos of actual lightning.

When we saw a fairly active lightning storm afoot, my wife quickly set up my camera on a tripod, shielded it from rain, and shot 30″ exposures until she caught one of the bolts. It’s not a photo that’s going to be on any magazine covers, but it is hers, and I think we all know how much that matters to an enthusiast of photography.
Before I close part one of this short series on night photography, I’ll present one more technique. So far, we’ve only manipulated the camera to create the variety of effects discussed above, but one more benefit of longer exposure times is that you actually have time to manipulate your subject, mid-photo. One of the most fun ways to use this? Ghost photography!

Thanks for joining me in taking a look at how photography changes at night. Come back tomorrow for an exploration—with plenty of pictures!—of how you can take more control by adding your own artificial lights. On Sunday, we’ll conclude with a special feature on introducing fire and ultra-specialized lighting equipment!
Still not enough? Come to Mike’s Camera (Park Meadows) on May 23rd for an in-depth, intimate workshop on night photography techniques, including both a lecture and a field trip to shoot as a group. Sign up here today!
4 comments